

This content may include affiliate links, which means if you click on them, I may get a commission. The cool thing is, there’s no extra cost to you!
How to label school gym clothes … that won’t wash off – using Cricut for Back to School
Inside: the quick & easy way to permanently label your child's school gym clothes or PE uniform that won't wash off, fade, or peel away.
This is a sponsored conversation written by me on behalf of Cricut. The opinions and text are all mine.
My son is entering middle school this fall. Top of the school supplies list: PE uniforms. If you have a teen or tween, you might be trying to figure out this whole gym clothes issue too.
How do you find gym clothes for school?
Many schools offer approved gym clothes for sale in the school office or athletics department. Our school has an approved PE uniform. They offered a screen-printed t-shirt and shorts set for sale at back to school night for $30.
Your school may allow you to purchase gym shorts and t-shirts on your own. Be sure to check the PE uniform guidelines from your school athletics director to make sure the shirt and shorts are the correct length, color, and material to comply with the uniform guidelines.
The problem with traditional gym clothes labels …
With all the kids wearing the same outfits to gym class and then changing them in the same locker room, it's guaranteed the clothes are going to get mixed up. Parents of teens and tweens, you know how your kids don't pay attention to these things! It's imperative that you label your kids' gym clothes to help them keep track of them in chaotic locker rooms.
Labels on gym clothes
School-issued gym clothes typically have a white screenprinted bar on them for labeling. Our school advised us to use an indelible or permanent marker to label each piece of gym clothing with my son's last name and first initial.
Why permanent marker doesn't work
Permanent marker will fade after many washings and can be removed from clothing easily with rubbing alcohol. During the 36-40 weeks of a typical school year, you'll likely wash these gym clothes as many times.
Iron-on fabric labels can be peeled off easily.
In both cases, another child could mistakenly grab your child's gym clothes and their parents could remove the markings indicating they belong to your child. Let's be real – we all know this happens!

The best way to label PE uniforms
The best way to create permanent labels is to cut iron-on labels using Cricut Iron-On Heat Transfer Vinyl material. Here's why:
- The Quality Assurance team tests that Cricut StrongBond will last many many washes
- StrongBond™ Guarantee: when Cricut Iron-On is used as directed, you’ll be completely satisfied with the results. If not, they'll replace it for free
- Cricut provides the exact heat setting you need for the iron-on material and fabric type to get the best results, so your iron-on will stick perfectly every time
So, how can you make custom iron-on labels for your kids' PE clothes?
How to create custom iron-on gym clothes labels that last after many many washes
It's easy to use the Cricut Maker machine to cut custom iron-on transfers for your PE uniforms.

Here's what you'll need:
Tools:
- Cricut Maker
- Cricut EasyPress 2 (any size)
- Cricut EasyPress mat
- Cricut cutting mat
- Cricut Weeding Tool Set
- measuring tape
- computer or ipad loaded with Cricut Design Space
Supplies:
- Cricut Iron-On Vinyl in your school's colors
- PE uniform
- gym bag
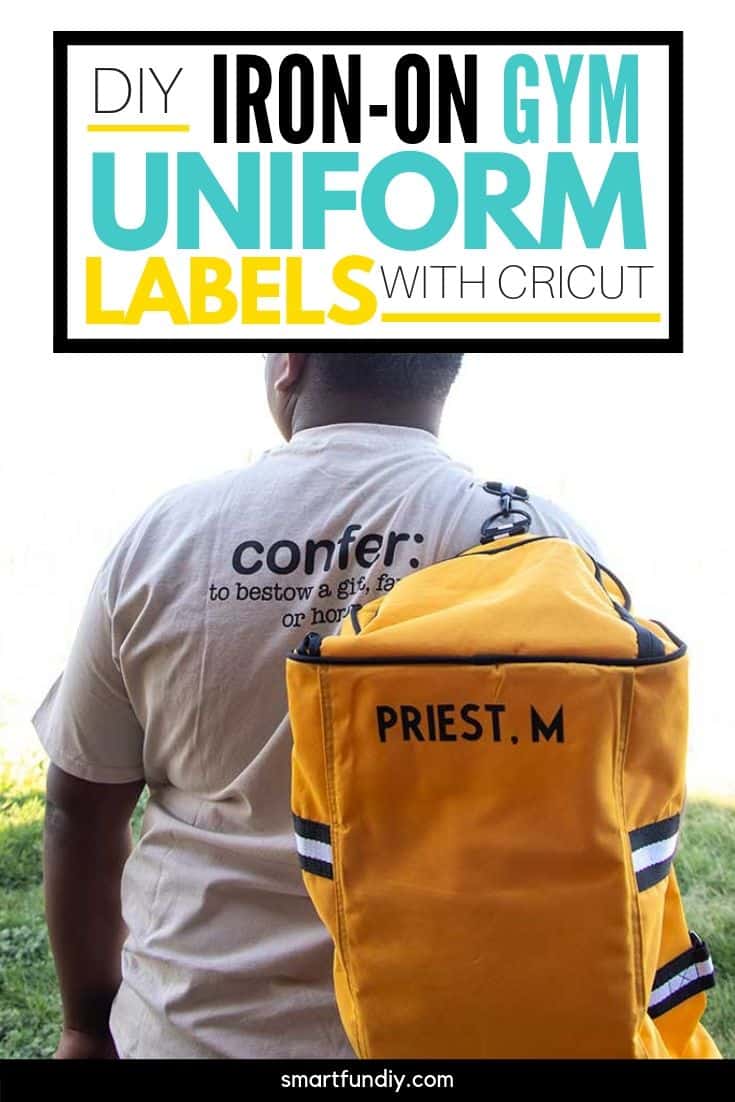
I found an awesome, affordable gym bag online for my son to carry his PE clothes to and from school. He'll bring the clothes from home on Mondays, stowing the bag and clothes in his PE locker during the week. On Friday, he'll pack the clothes into the gym bag to bring them home for washing.
Customize the bag with your school mascot, logo, or name in addition to your child's name.
How to design and cut your iron-on labels for PE uniforms
- Open Cricut Design Space on your computer or ipad.
- Type your child's name. I recommend using a block font that will be easy to weed and easy to read.

- Size the name to fit the white label block on the PE Uniform. If the gym clothes don't have a screen-printed label, select an area to place the iron-on name, usually about 1″ high.
- Duplicate the name in the Design Space to create as many labels as you need.

- Cut a piece of Cricut StrongBond iron-on material to fit on a cutting mat.
- Apply to the mat.
- Insert into the Cricut Maker machine.
- Set the machine to cut the Cricut StrongBond iron-on material and start the cut.
- Remove the cutting mat from the Cricut Maker.
- Using a weeding tool, remove (or weed) the excess iron-on transfer material around your design.
- Set up the Cricut EasyPress2 to begin heating. Check the settings for StrongBond iron-on transfer material and for the type of fabric your PE uniforms are made from. The t-shirt and shorts may be sewn from different fabric types so you'll need to adjust the Cricut EasyPress settings for each.

Tip: Get even heat application with Cricut EasyPress versus using a home iron
- Place the tshirt or shorts on the EasyPress mat. Postion the iron-on transfer name on the item.
- When ready, place the EasyPress 2 on top of the iron-on transfer, applying pressure as directed by the EasyPress 2 instructions for that material.

- Remove the EasyPress 2 and peel away the backing sheet as directed.
My son loves the way the labels turned out! And I love that they won't fade as I wash his PE clothes all year long. Now to go back to school shopping for the running shoes he'll need … eeek!
Find out more about Cricut Iron-On Heat Transfer Vinyl HERE.
Comments submitted may be displayed on other websites owned by the sponsoring brand.
About the Author

Jennifer Priest is a 20+ year designer in the arts & crafts industry and home DIYer with a passion for creativity. An Army veteran raised on a ranch, from her experience, she shares smart DIY projects that save money and fun craft ideas that anyone can make. Besides blogging, Jennifer is a Master Practitioner and Trainer of NLP, Hypnosis, and MER, and coaches other online entrepreneurs on money mindset, business, and living an intentional life. When not blogging, Jennifer is having adventures in the wilderness, on road trips, playing with her cats, and making paleo food.


One Comment